Custom WSS components
Although it is a great job by WSS sites which you create through the browser, there is a point where you would need to create custom features like web parts, workflows, event handlers which fit to your requirements. For this surely you would need coding fro custom WSS components.
WSS Features
WSS Features
It is better to learn from the WSS features. Features provide the mechanism for defining site elements and adding them to a target site or site collection through a process known as feature activation. The element types that can be defined by a feature include menu commands, link commands, page templates, page instances, list definitions, list instances, event handlers, and workflows.
Your first WSS Custom feature
- Start Visual studio
- Create a new C# class library DLL project named "HelloWorld" (New Project---ProjectType=Visual C#---Template=Class library)
Before creating the feature.xml file, consider that the files for this feature must be deployed in their own special directory inside the WSS system directory named FEATURES. The FEATURES directory is located inside another WSS system directory named TEMPLATE.
c:\Program Files\Common Files\
Microsoft Shared\web server extensions\12
\TEMPLATE\FEATURES
- To make the deployment easier create a directory named TEMPLATE inside the root directory of the project.
- Now inside TEMPLATE directory create another directory named FEATURES and inside FEATURES create a directory with the same name of the project "HelloWorld"
- Next, create an XML file named feature.xml inside the HelloWorld directory. This is where you will added the XML-based information that defines the high-level attributes of the feature itself. Add the following XML to the feature.xml file to add a top-level Feature element along with attributes that define the feature itself.
< Feature
Id=""
Id=""
Title="Hello World First Feature"
Description="This is my very first custom feature"
Scope="Web"
Hidden="FALSE"
ImageUrl="menuprofile.gif"
xmlns="http://schemas.microsoft.com/sharepoint/">
<ElementManifests>
<ElementManifests>
<ElementManifests Location="ElementManifests" />
</ElementManifests>
</Feature>
</ElementManifests>
</Feature>
- You must create a new GUID, from tools--Create GUID--Select fourth option (Registry format)--click copy--paste in the feature id element.
- Now it’s time to create the element.xml file and define a single CustomAction element that will be used to add a simple menu command to the Site Actions menu. Add the following XML, which defines a CustomAction element to elements.xml.
<Elements xmlns="http://schemas.microsoft.com/sharepoint/"> <CustomAction Id="SiteActionsToolbar" GroupId="SiteActions" Location="Microsoft.SharePoint.StandardMenu" Sequence="100" Title="Hello World" Description="A custom menu item added using a feature" ImageUrl="_layouts/images/menuprofile.gif" > </CustomAction > </Elements> This CustomActions element has been designed to add a menu command to the Site Actions menu. It provides a user-friendly Title and Description as well as a URL that will be used to redirect the user when the Menu command is selected.
Installing the feature
- First copy the HelloWorld feature directory to the system FEATURES directory. copy the folder inside TEMPLATE--FEATURES in the project created and paste it inside "C:\Program Files\Common Files\Microsoft Shared\web server extensions\12\TEMPLATE\FEATURES"
- Then you have to execute a STSADM.EXE commands.
- Go to c:\program files\common files\microsoft shared\ web server extensions\12\bin through commandline.
- Then execute the following command
STSADM.EXE -o installfeature -filename HelloWorld\feature.xml -force
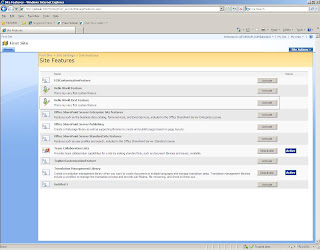
- Now you can check the successful feature installation by go to the site you created and then Site Actions--Site Settings--Under Site Administration; Site Features
- Here you can view all the site features currently installed, here you can see the "Hello World First Feature"
- Either you can activate it through browser by clicking Activate button or through command line.
- command line from the same place where you installed the feature
STSADM -o activatefeature -filename HelloWorld\feature.xml -url-force
- First copy the HelloWorld feature directory to the system FEATURES directory. copy the folder inside TEMPLATE--FEATURES in the project created and paste it inside "C:\Program Files\Common Files\Microsoft Shared\web server extensions\12\TEMPLATE\FEATURES"


Comments
Post a Comment